Menus

Fig. 1
The menu bar can been seen in figure 1.
The File menu
The file menu has the following submenus:
- New: to create a new PCAD project
- Save: to save a file
- Save as...: to save a file under a new name
- List of the 4 last projects
- Print: to print a project
- Quit: to exit PCAD
Note: when you print a project, the grid is not printed - only to save ink.
Anoter note: when you print a project and the title block is hidden, PCAD asks you if you want to show it - just in case you wanted to print it to have some project related information on the printout.
The Edit menu
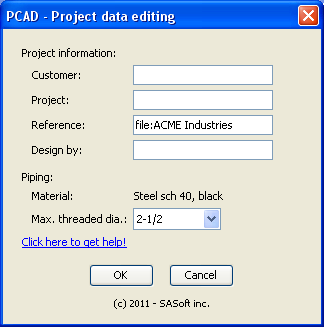
Fig. 2
The Edit menu has only 1 submenu: Project data. This submenu displays the Project data editing dialog box shown in figure 2.
The fields to be entered are:
- Customer name
- Project
- Reference
- Design by
You also have to enter the maximum diameter for threaded joints. All sections with a diameter equal or smaller to this one will have threaded joints. Sectons with a diameter larger than this one will have welded joints. This information is used by PCAD to use the right type of joints when calculating pressure drop and making the bill of material.
The View menu
The View menu allows you to show or hide information about your project. Visual information is grouped in 2 blocks:
piping related information:
- Hide or show section no
- Hide or show pressure
- Hide or show flow
drawing related information:
- Hide or show the grid
- Hide or show the title block
The diameters, if they have been computed, are always displayed.
The Reports menu
See the Reports page of this tutorial.
The Help menu
The On line tutorial menu takes you to this tutorial
Back to top